In working on VisioBot3000, I’ve spent a lot of time looking at VBA in Visio’s macro editor. It’s one of the easiest ways to find out how things work. I thought it would be fun to take some VBA and convert it to PowerShell to demonstrate the process.
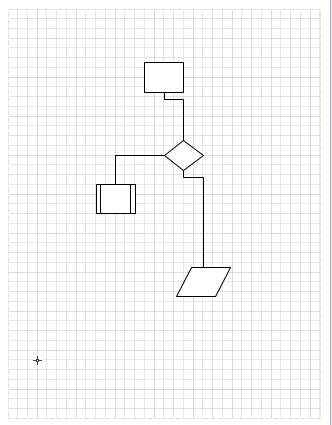
We’ll start with a basic diagram using flowchart shapes and normal connectors. It doesn’t really matter what is on the diagram, though, because we’re just using it to make Visio tell us how to do things.
Here’s my diagram:
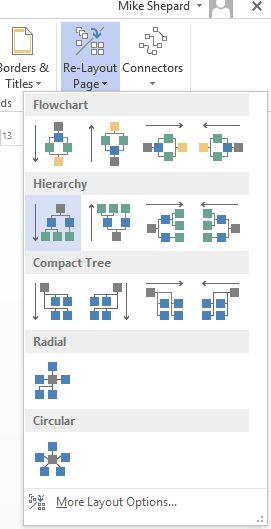
As our first “translation” exercise, let’s try setting the page layout to “circular”. To do that in the app, we’ll go to the Design tab, select the Re-Layout Page dropdown, and select Circular.
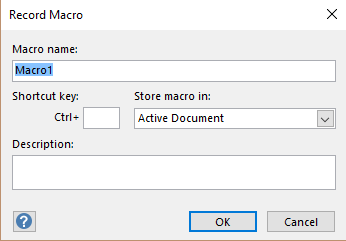
Before we do that, though, let’s turn on macro recording. The easiest way to do that is to click the icon on the status bar:
![]()
When we do that, a dialog will pop up asking you what to name the new macro. It doesn’t matter, just remember what name you use (or leave it alone) because we’re going to look at the macro to see what’s going on. I named mine circular after I took this screenshot:
After you click ok, select the menu item you wanted (Design/Re-Layout Page/Circular).
When you did that, it applied the new layout to the page, just as expected. Now, click the “stop” button on the status bar (which replaced the “record a macro” button on the status bar) to stop recording.
![]()
Now, you want to look at the macro, and to do that you need to go to the developer tab on the ribbon. If you don’t have a developer tab, you need to go to the file tab, select Options, Advanced, and under General, select “Run in Developer Mode”.
![]()
Whew…that’s a lot of work just to get a macro recorded. Next time it will be easier since you know how to do it.
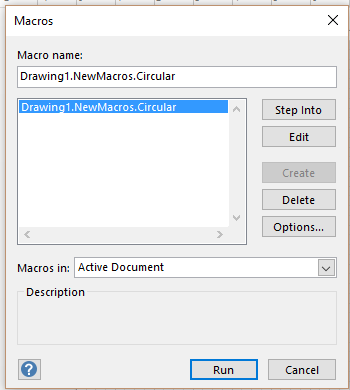
Let’s look at the macro. On the developer tab, click the macros button, bringing up the list of macros that have been recorded in this document, and select the macro you just recorded. Click the Edit button to see the source.
Here’s what Visio recorded when we made that single formatting change:
Sub Circular()

    'Enable diagram services
    Dim DiagramServices As Integer
    DiagramServices = ActiveDocument.DiagramServicesEnabled
    ActiveDocument.DiagramServicesEnabled = visServiceVersion140 + visServiceVersion150

    Dim UndoScopeID1 As Long
    UndoScopeID1 = Application.BeginUndoScope("Lay Out Shapes")
    Application.ActiveWindow.Ptage.PageSheet.CellsSRC(visSectionObject, visRowPageLayout, visPLOPlaceStyle).FormulaForceU = "6"
    Application.ActiveWindow.Page.PageSheet.CellsSRC(visSectionObject, visRowPageLayout, visPLORouteStyle).FormulaForceU = "16"
    Application.ActiveWindow.Page.Layout
    Application.EndUndoScope UndoScopeID1, True

    'Restore diagram services
    ActiveDocument.DiagramServicesEnabled = DiagramServices

End Sub
I see the following basic steps:
- Save the current DiagramServicesEnabled setting (line 4-5)
- Set the DiagramServicesEnabled property to a new value (line 6)
- Set a checkpoint for “undo” (line 9)
- Do the layout that we asked for (line 10-12)
- End the “undo” checkpoint (line 13)
- Put the DiagramServicesEnabled property back how we found it (line 16)
The DiagramServicesEnabled property belongs to a document, so in our code we could use the Get-VisioDocument cmdlet to get the current one. The reference page on that property has a handy list of values for the different levels of diagram services (we need visServiceVersion140 and visServiceVersion150, which are 7 and 8, respectively).
It’s completely up to you if you want to provide the ability to undo operations. I haven’t included this “feature” in VisioBot3000, but it seems like it would be pretty easy.
The actual layout operation uses the current page, so now we could use Get-VisioPage to get the current page as an object. There are 2 calls to CellSRC (which stands for Section, Row, Column, btw) with a bunch of constants.
There are 2 different ways to handle these:
First, you can google the constants and replicate the lines verbatim (yuck). That works, but leaves the code full of “magic numbers”.
Alternatively, you can look at the last constant (visPLOPlaceStyle, visPLORouteStyle) and google them. Let’s look at the first (visPLOPlaceStyle). One of the first links is to the VisCellIndices page here. You probably want to bookmark that page if you’re dealing with the Visio API. You will use it all the time. Anyway, searching on the page for visPLOPlaceStyle tells you that this is the “PlaceStyle” cell. That means you can replace that huge call with:
$Page.Cells(‘PlaceStyle’)=6. You don’t really need the formula to set it, but if you want you can do $Page.Cells(‘PlaceStyle’).Formula=’=6′. Since it’s just a number (with no units), this works fine.
Similarly, the other CellSRC call can be replaced by $Page.Cells(‘RouteStyle’)=16.
Putting all of that together into a function with VisioBot3000 looks like this:
Import-Module VisioBot3000

function Set-VisioCircularLayout{

    $Visio=Get-VisioApplication

    $document=Get-VisioDocument
    #or $document=$Visio.ActiveDocument

    #save the document setting
    $SaveSetting=$document.DiagramServicesEnabled
    $document.DiagramServicesEnabled=(7+8)

    $UndoScope=$Visio.BeginUndoScope("Lay Out Shapes")

    $page=Get-VisioPage

    #Make the layout change
    $Page.Cells('PlaceStyle')=6
    $Page.Cells('RouteStyle')=16

    $Page.Layout()


    $Visio.EndUndoScope($UndoScope,1)

    #put the setting back
    $document.DiagramServicesEnabled=$SaveSetting
}
Hope that made sense. Next time I’ll talk about how I deal with all of the Visio constants.
–Mike