Starting a PowerShell DSL for WPF Apps

The problems

There is always a problem. In my case, I had two problems.

First, when I teach PowerShell, I mention that it’s a nice language for writing DSLs (domain-specific languages). If you want an in-depth look, Kevin Marquette has a great series on writing DSLs. I highly recommend reading it (and everything else he’s written). I’m going to cover some of the same material he did, but differently.

Anyway, back to the story. When I mention DSLs, I generally get a lot of blank stares. Then, I get to try to explain them, but I don’t have a great example (Pester, Psake, and DSC are a bit advanced). So I was looking for a DSL I could write that would be easy to explain, with the code and output straight-forward. That’s the first problem.

The second problem, again from teaching, is when I talk about writing GUIs. This is always a popular topic, and it’s a lot of fun to discuss the different options. I get asked about when it is a good idea to write a UI in PowerShell vs. when it would make more sense to do it in a managed language. My answer is something along the lines of “If it’s something simple like a data-entry form, then PowerShell is a great fit. If it has much complexity you are probably going to want to use C#.” I got thinking after teaching last November that writing a data-entry form in PowerShell really isn’t that easy.

PowerShell to the rescue!

I decided that I needed to remedy the situation. Writing a data-entry form (where we’re not super concerned about the look-and-feel) should be trivial.

My first thought was that I should be able to write something like this:

Window {
    TextBox FirstName
    TextBox LastName
    TextBox EmailAddress
}

And have PowerShell present you with a reasonable looking UI. After pressing Ok (Ok/Cancel would be added automatically), it would output an object with properties named FirstName, LastName, and EmailAddress.

The first swag at the code looked something like this (fwiw, this is a reconstruction, not the actual code).

First, the TextBox function:

function TextBox {
    [CmdletBinding()]
    Param($Name)
    $Properties = @{ Name = $name ;MinWidth=100}
    New-Object System.Windows.Controls.TextBox -Property $properties
}

That’s pretty simple. It takes the name as a parameter and outputs a textbox with that name.

The Window function is a bit trickier. The controls (textboxes and labels) are going to go in a 2-column grid (so we don’t have to fight hard with the layout).

Also, for now I’m going to leave off the ok/cancel buttons (so I also have to pretend you pressed ok), but this is a great start.

Here’s attempt 1 at the code:

Add-Type -AssemblyName PresentationFramework
function Window {
    [CmdletBinding()]
    Param($contents)
    $window = new-object system.windows.window -Property @{ SizeToContent = 'WidthAndHeight'}
    $grid = new-object System.Windows.Controls.Grid -Property @{Margin=10}

    $window.Content = $grid
    $grid.ColumnDefinitions.Add((new-object System.Windows.Controls.ColumnDefinition -property @{ Width = 'Auto'}))
    $grid.ColumnDefinitions.Add((new-object System.Windows.Controls.ColumnDefinition -property @{ Width = '*'}))
    $controls = & $Contents
    $row = 0
    foreach ($item in $controls) {
        $grid.RowDefinitions.Add((new-object System.Windows.Controls.RowDefinition ))
        $label = New-Object System.Windows.Controls.Label -Property @{Content = $item.Name}
        [System.Windows.Controls.Grid]::SetRow($label, $row)
        [System.Windows.Controls.Grid]::SetColumn($label, 0)
        $grid.Children.Add($label) | out-null

        [System.Windows.Controls.Grid]::SetRow($item, $row)
        [System.Windows.Controls.Grid]::SetColumn($item, 1)
        $grid.AddChild($item) | Out-Null
        $row++
    }
    if($window.ShowDialog() -or $true){
        $output=[Ordered]@{}
        foreach($item in $controls){
          $output[$item.Name]=$item.Text
        }
        [PSCustomObject]$output
      }
}

Most of the code is pretty straight-forward. I execute the $Contents parameter to get the controls. Then I loop through those and create labels in the first column and put the control in the second column.

After calling the ShowDialog() method on the window (and using -or $true to fake out the missing OK button), loop through the controls and output an object with properties and values harvested from the name and text of the controls.

Here’s what the example looks like when you run it:


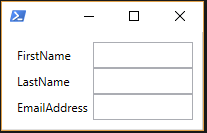
Not a lot of code for that result.

What’s missing though?

  1. Only textboxes?  Need several other controls
  2. OK/Cancel
  3. with other controls, reading the text property won’t be a strategy
  4. Nested controls
  5. Populating controls
  6. Events
  7. ContextMenus
  8. Setting control properties

Stay tuned for more of this WPF DSL.

–Mike

P.S.  It has been pointed out to me that I didn’t explain what a DSL is.  For now, I’d point you to the Kevin Marquette articles I linked above.  I’ll post tomorrow with a quick “what is a DSL and why”.

Celebrating 1 Year of Southwest Missouri PowerShell User Group (SWMOPSUG)

So…we’ve been meeting in Springfield, MO for a year now.

Our first meeting was in June 2017 and had our “anniversary” meeting earlier this month.  Thanks to Scott for presenting a talk about PowerShell jobs!

We haven’t had big crowds, but we have had good consistent attendance.  Looking forward to another year and reaching out to more people in the community.

If you’re in the southwest Missouri area (or close by), let me know and I’ll be happy to see where we can get you scheduled to speak.

If you’re interested, you can find details about upcoming events on our meetup page.

–Mike


A Modest Proposal about PowerShell Strings

If you’ve used the PowerShell Script Analyzer before you are probably aware that you shouldn’t be using double-quoted strings if there aren’t any escape characters, variables, or subexpressions in them.  The analyzer will flag unnecessary double-quotes as problems.  That is because double-quoted strings are essentially expressions that PowerShell needs to evaluate.

Let me repeat that…

Double-quoted strings are expressions that PowerShell needs to evaluate.

Single-quoted strings, on the other hand, are just strings.  There’s nothing (aside from doubled single-quotes being replaced by a single single-quote) that needs to be done with them.

When I teach about PowerShell, I usually say something along the lines of “double quotes are an indication to PowerShell that there’s some work to do here”.  I was thinking about this the other day and I think a shift in terminology will be helpful.  Calling them double- and single-quoted strings is descriptive, but not very helpful.

My proposal is simply this:

Single-quoted strings will henceforth be called “strings”.

Double-quoted strings will henceforth be called “string expressions”.

“String expression” gives me the idea that it is going to be evaluated.  Which fits double-quoted strings perfectly.  It’s also shorter than saying “double-quoted string”, which is a bonus.

“String” sounds (to me, at least), like something static.  Matches the situation again.

For those that think “why not just use double-quoted strings all the time?”, I would counter: Would you use Resolve-Path against C:\?  Probably not, because it would be a waste of time.  There’s nothing to do.  Resolve-Path expands wildcards and there are no wildcards there.  I guess you could use Resolve-Path with every path just to be safe…but you get the point.

What do you think of this proposal?  Do “string” and “string expression” convey enough that they should be used?  Let me know in the comments.

FWIW, I’m going to be using them whether you agree.  🙂


–Mike

Get-Learning – Launching Powershell

I thought I’d take a few minutes and show several ways to launch PowerShell. I’ll start with the basics and maybe by the end there will be something you haven’t seen

before.

The Start Menu

One of the first places to look for PowerShell is in the Start Menu. Opening the start menu and typing “PowerShell” will get you something like this:


Note that there are several options

  • Windows PowerShell (64-bit console)
  • Windows PowerShell ISE (64-bit ISE)
  • PowerShell-6.0.0 (PowerShell Core…you might not have this)
  • Windows PowerShell (x86)  (32-bit console)
  • Windows PowerShell ISE (x86) (32-bit ISE)

There’s also a “debuggable package manager”, which is a Visual Studio 2017 tool (and essentially the 32-bit console).

For each of these, you can click on it to launch, but there are other options as well:

  • Click to run a standard PowerShell session
  • Right-Click and choose “Run As Administrator” to run an elevated session (if you are a local administrator)

You’ll also notice that the right-click menu has options to run the other versions (ISE/Console, 32/64-bit).

The Run dialog

From the Run dialog (Windows-R), you can type PowerShell or PowerShell_ISE to launch the 64-bit versions of these tools.

What you may not know (and I just learned this recently, thanks Scott) is that if you hit ctrl-shift-enter, instead of just hitting enter, it will run them elevated (as administrator).

Windows Explorer

The final place I’m going to mention is Windows Explorer.  If you have it open, you can launch PowerShell or the ISE in the current directory by typing PowerShell or PowerShell_ISE in the address bar like this:


Can you think of other ways to launch PowerShell (other than from PowerShell…that would be cheating)?  Let me know in the comments.


–Mike

Old School PowerShell Expressions vs New

In a recent StackOverflow answer, I wrote the following PowerShell to find parameters that were in a given parameter set (edited somewhat for purposes of this post):

$commandName='Get-ChildItem'
$ParameterSetToMatch='LiteralItems'

$ParameterList = (Get-Command -Name $commandName).Parameters.Values

foreach($parameter in $parameterList){
    $parameterSets=$parameter.ParameterSets.Keys
   if ($parameterSets -contains $parameterSetToMatch ){
        write-output $parameter.Name
    }
}

A quick note…it’s not correct. It only shows parameters that are explicitly in the parameter set. Items that aren’t marked with any parameter set are in all parameter sets, and this doesn’t include them. That is beside the point.

Note that I’m looking through collections with a loop and an if statement.

A bit better

I could have made it a bit better with Where-Object (it’s still a bit bad because hashtable iteration isn’t nice):

$ParameterList.GetEnumerator() | 
   Where-Object {$_.Value.parameterSets.Keys  -contains 'Items'} | 
   Select-Object -Property Key

The “new” way

When I say new, I mean “PowerShell 3.0 new”. I still have a lot of PowerShell 1.0 muscle-memory that I need to get rid of. This post is part of the attempt. 🙂

Now, I’m going to use two features that were added to PowerShell 3.0 that I don’t use often enough: Member Enumeration and Where().

Member Enumeration says I can refer to members of the items in the collection through the collection.

For instance,

(Get-ChildItem -file).Length

Get-ChildItem returned a collection of files which each have a length property.

So instead of using ForEach-Object or Select-Object, I can use dot-notation against the collection and get the properties of the items in the collection. Nifty shortcut.

The second feature I’m going to use is the Where() method. This method is available with any collection object, and is (in the simplest case) just like using Where-Object.

Putting those two together, I get this:

$ParameterList.GetEnumerator().Where{$_.Value.parameterSets.Keys  -contains 'Items'}.Key

What is amazing about this to me isn’t how short it is (although it is short).

The amazing part is that I logically looped through a collection of objects looking for items in the collection which matched specific criteria, then extracted a particular property of those objects….and I didn’t need to use a pipeline at all.

I’m a big fan of pipelines, and the general-purpose *-Object cmdlets allow us to manipulate data with ease. However, that power comes at a price. Pipelines cost memory and time. This expression doesn’t incur the “penalties” of using a pipeline but gets us all of the benefit.

What do you think? Is the new version better?

Getting Data From the Middle of a PowerShell Pipeline

Pipeline Output


If you’ve used PowerShell for very long, you know how to get values of of a pipeline.

$values= a | b | c

Nothing too difficult there.

Where things get interesting is if you want to get data from the middle of the pipeline. In this post I’ll give you some options (some better than others) and we’ll look briefly at the performance of each.

Method #1

First, there’s the lovely and often overlooked Tee-Object cmdlet. You can pass the name of a variable (i.e. without the $) to the -Variable parameter and the valu

es coming into the cmdlet will be written to the variable.

For instance:

Get-ChildItem c:\ -Recurse | 
                   Select-Object -Property FullName,Length | 
                   Tee-Object -Variable Files | 
Sort-Object -Property Length -Descending

After this code has executed, the variable $Files will contain the filenames and lengths before they were sorted.  To append the values to an existing variable, include the -Append switch.

Tee-Object is easy to use, but it’s an entire command that’s essentially not doing anything “productive” in the pipeline. If you need to get values from multiple places in the pipeline, each would add an additional Tee-Object segment to the pipeline. Yuck.

Method #2

If the commands you’re using in the pipeline are advanced functions or cmdlets (and you’re only writing advanced functions and cmdlets, right?), you can use the -OutVariable common parameter to send the output of the command to a variable.  Just like with Tee-Object, you only want to use the name of the variable.

If you’re dealing with cmdlets or advanced functions, this is the easiest and most flexible solution. Getting values from multiple places would just involve adding -OutVariable parameters to the appropriate places.

 
Get-ChildItem c:\ -Recurse | 
    Select-Object -Property FullName,Length -OutVariable Files | 
    Sort-Object -Property Length -Descending 

This has the benefit of one less command in the pipeline, so that’s a nice bonus. If you want to append to an existing variable, here you would use a plus (+) in front of the variable name (like +Files).

Method #3

This method is simply to break the pipeline at the point you want to get the values and assign to a variable. Then, pipe the variable to the “remainder” of the pipeline. Nothing crazy. Here’s the code.

 
$files=Get-ChildItem c:\ -Recurse | 
    Select-Object -Property FullName,Length 
$files | Sort-Object -Property Length -Descending 

If you want to append, you could use the += operator instead of the assignment operator.

If you want to capture multiple “stages” in the pipeline, you could end up with a bunch of assignments and not much pipeline left.

Method #4

This method is similar to method #3, but uses the fact that assignment statements are also expressions. It’s easier to explain after you’ve seen it, so here’s the code:

 
($files=Get-ChildItem c:\ -Recurse | 
    Select-Object -Property FullName,Length) | 
    Sort-Object -Property Length -Descending 

Notice how the first part of the pipeline (and the assignment) are inside parentheses? The value of the assignment expression is the value that was assigned, so this has the benefit of getting the variable set and passing the values on to the remainder of the pipeline.

If you want to get multiple sets of values from the pipeline, you would need to nest these parenthesized assignments multiple times. Statements like this can only be used as the first part of a pipeline, so don’t try something like this:

 
#  THIS WON'T WORK!!!!!
Get-ChildItem c:\ -Recurse | 
    Select-Object -Property FullName,Length) | 
    ($Sortedfiles=Sort-Object -Property Length -Descending) 

Performance

I used the benchmark module from the gallery to measure the performance of these 4 techniques. I limited the number of objects to 1000 and staged those values in a variable to isolate the pipeline code from the data-gathering.

$files=dir c:\ -ErrorAction Ignore -Recurse | select-object -first 1000

$sb1={$files | select-object FullName,Length -OutVariable v1 | sort-object Length -Descending}
$sb2={$files | select-object FullName,Length | tee-object -Variable v2| sort-object Length -Descending}
$sb3={$v2=$files| select-object FullName,Length;$files | sort-object Length -Descending}
$sb4={($v2=$files| select-object FullName,Length)|sort-object Length -Descending}
Measure-These -ScriptBlock $sb1,$sb2,$sb3,$sb4 -Count 100 | Format-Table

Title/no. Average (ms) Count   Sum (ms) Maximum (ms) Minimum (ms)
--------- ------------ -----   -------- ------------ ------------
        1     98.60119   100   9860.119     131.7581      87.6203
        2    120.32475   100 12032.4754     150.4985     104.6586
        3    100.92144   100 10092.1436     132.2665      90.0685
        4     98.48383   100   9848.383     135.5229      84.7717

The results aren’t particularly interesting. -OutVariable is about 20% slower than the rest, but other than that they’re all about the same. I’m a little bit disappointed, but 30% isn’t that big of a difference to pay for the cleaner syntax and flexibility (in my opinion).

BTW, those timings are for Windows PowerShell 5.1. The numbers for PowerShell 6.0 (Core) are similar:

Title/no. Average (ms) Count  Sum (ms) Maximum (ms) Minimum (ms)
--------- ------------ -----  -------- ------------ ------------
        1    120.97498    10 1209.7498     136.1319     112.0041
        2     139.9865    10  1399.865      147.659     132.1466
        3    128.86957    10 1288.6957     148.0096     115.0421
        4    119.44978    10 1194.4978     142.9651     109.1328

Here we see slightly less spread (17%), but all of the numbers are a bit higher.

I’ll probably continue to use -OutVariable.

What about you?

PowerShell Reflection-Lite

hand mirror with reflectionN.B. This is just a quick note to relate something I ran into in the last couple of weeks. Not an in-depth discussion of reflection.

Reflection

Reflection is an interesting meta-programming tool. Using it, we can find (among other things) a constructor or method that matches whatever criteria we want including name, # of parameters, types of parameters, public/private, etc. As you can imagine, using reflection can be a chore.

I have never had to use reflection in PowerShell. Usually, `Get-Member` is enough to get me what I need.

Dynamic Commands in PowerShell

I have also talked before about how PowerShell lets you by dynamic in ways that are remarkably easy.

For instance, you can invoke an arbitrary command with arbitrary arguments with a command object (from `Get-Command`), and a hashtable of parameter/argument mappings simply using `& $cmd @params`.

That’s crazy easy. Maybe I’ve missed that kind of functionality in other languages and it’s been there, but I don’t think so. At least not often.

I had also seen that the following work fine:

$hash=@{A=1;B=1}
$prop='A'

#use the key as a property
$hash['A'] -eq $hash.A

#use a variable as a property name
$hash['A'] -eq $hash.$prop

#use a string literal as a property name
$hash['A'] -eq $hash.'A'

What I found

I was working on some dynamic WPF suff (posts coming this week, I promise) and needed to add an event handler to a control. The problem was that the specific event I was adding a handler for was a parameter. In case you didn’t know, adding an event handler to a WPF control looks something like this (we’ll use the TextChanged event):

  $textbox.Add_ContentChanged({scriptblock})

Or, if you prefer, you can omit the parentheses if the only parameter is a scriptblock:

  $textbox.Add_ContentChanged{scriptblock}

The issue was that the name of the method is different for each event. I thought “Oh, no! I’m going to have to use reflection”.

But then I thought…I wonder if PowerShell has already taken care of this. I tried the following:

# $control, $eventName, and $action were parameters 
$control."Add_$EventName"($action)

I figured that the worst that could happen was that it would blow up and I’d dig out a reference on using reflection (and probably translate from C#).

Instead, it worked like a charm.

Chalk another win up for the PowerShell team. In case you hadn’t noticed, they do good work.

–Mike

No PowerShell Goals for 2018

After three years (2015, 2016, 2017) of publishing yearly goals, I’ve decided to not do that this year.

One reason is that I’ve not done a great job of keeping these goals in the forefront of my mind, so they haven’t (for the most part) been achieved.

I definitely fell off the wagon a few times in terms of keeping up with regular posting here. 27 posts last year, so about one every 2 weeks. I’d like to get to where I’m posting twice per week.

I did not work on any new projects (writing, video course, etc.) throughout the year.

In 2017 I’ve been working on:

  • VisioBot3000 – now in the PSGallery
  • Southwest Missouri PowerShell User Group (SWMOPSUG) – meeting since June
  • Speaking at other regional groups (STL and NWA)

Recently (mostly in 2018), I’ve also been working on:

  • PowerShell Hosting
  • WPF in PowerShell (without XAML)

I’m going to try to get back on the ball and post twice a week. Weekly goals rather than yearly…that way if I mess up a week, I can still succeed the next one. 🙂

Mike

Visio Constants in VisioBot3000

One of the great things about doing Office automation (that is, COM automation of Office apps) is that all of the examples are filled with tons of references to constants. A goal of VisioBot3000 was to make using those constants as easy as possible.

I mentioned the issue of having so many constants to deal with in a post over 18 months ago, but haven’t ever gotten around to showing how VisioBot3000 gives you access to some (most?) of the Visio constants.

First, here’s a snippet of code from that post:

$connector.CellsSRC(1,23,10) = 16
$connector.CellsSRC(1,23,19) = 1 

which includes the following constants (except that it uses the values rather than the names):

  • visSectionObject = 1
  • visRowShapeLayout = 23
  • visSLORouteStyle = 10
  • visLORouteCenterToCenter = 16
  • visSLOLineRouteExt = 19
  • visLORouteExtStraight = 1

VisioBot3000 Constants Take 1

So, the straight-forward thing to do would be to define a variable for each of the constants like this:

$visSectionObject = 1
$visRowShapeLayout = 23
$visSLORouteStyle = 10
$visLORouteCenterToCenter = 16
$visSLOLineRouteExt = 19
$visLORouteExtStraight = 1

With those definitions (in the module, of course), we could re-write the code above like this:

$connector.CellsSRC($visSectionObject,$visRowShapeLayout,$visSLORouteStyle) = $visLORouteCenterToCenter
$connector.CellsSRC($visSectionObject,$visRowShapeLayout,$visSLOLineRouteExt) = $visLORouteExtStraight

That looks a lot less cryptic, or at least the constant names go a long way towards helping explain what’s going on.

Even better, if we had all of the Visio constants defined this way it would make translating example code (and recorded macro code) a lot easier.

Wait…there’s a problem.

There are over 2000 constants defined. Guess how long it takes PowerShell to parse and execute over 2000 assignment statements? Too long, as in several seconds.

VisioBot3000 Constants Take 2

\
So, my original approach was to take a list of Visio constants from a web page which doesn’t exist anymore (on PowerShell.com, redirects to an Idera site now). Some friendly PowerShell person had gone to the trouble of creating PowerShell assignment statements for each of the Visio constants, at least up to a point. I ended up adding a couple of dozen, but that’s a drop in the bucket. There were a whopping 2637 assignment statements.

When I added that code to the VisioBot3000 module, importing the module now took a noticeable amount of time. Another fun issue is that we just added 2637 variables to the session, which causes some fun with tab completion (think $vis….waiting…waiting).

Since that wasn’t a really good solution, I thought about what would be better.

My first thought would be an enumeration (enum in PowerShell). I thought briefly about lots of enumerations (one for each “set” of constants), but quickly discarded that idea as unusable.

A single enumeration would be an ok solution, but it would mean that VisioBot3000 only worked on PowerShell 5.0 or above. No dice (at least at this point).

I decided instead to create a single object called $Vis that had each constant as a property.

To do that, I needed a hashtable with 2637 members. I ended up using an ordered hashtable, but that doesn’t really change much.

The code in question is in the VisioConstants.ps1 file in VisioBot3000. It looks something like this:

$VIS=[Ordered]@{
#Public Enum VisArcSweepFlags 
ArcSweepFlagConcave = 0 
ArcSweepFlagConvex = 1 
#End Enum 
 
#Public Enum VisAutoConnectDir 
AutoConnectDirDown = 2 
AutoConnectDirLeft = 3 
AutoConnectDirNone = 0 
AutoConnectDirRight = 4 
AutoConnectDirUp = 1 
#End Enum 

# SNIP !!!!

#Public Enum VisDiagramServices
ServiceNone = 0
ServiceAll = -1
ServiceAutoSizePage = 1
ServiceStructureBasic = 2
ServiceStructureFull = 4
ServiceVersion140 = 7
ServiceVersion150 = 8

}
#End Enum 

$VIS=new-object PSCustomObject -Property $VIS

It turns out that the code runs quite a bit faster than the individual assignments and now there’s only one variable exposed. Intellisense is a bit slow to load the first time you do $Vis., but it’s pretty quick after that.

The re-written code above looks like this after this change:

$connector.CellsSRC($vis.SectionObject,$vis.RowShapeLayout,$vis.SLORouteStyle) = $vis.LORouteCenterToCenter
$connector.CellsSRC($vis.SectionObject,$vis.RowShapeLayout,$vis.SLOLineRouteExt) = $vis.LORouteExtStraight

It’s a tiny bit less direct, but it’s really easy to get used to.

In the spirit full disclosure, I should mention that a few of the refactored names of constants had to be quoted in order to be valid syntax in PowerShell, like these:

'1DBeginX' = 0 
'1DBeginY' = 1 
'1DEndX' = 2 
'1DEndY' = 3 

That’s enough for now. I think I’m about to start back to work on VisioBot3000…any ideas on features that would be nice to have (or are clearly missing)?

–Mike

Get-Learning : Why PowerShell?

As the first installment in this series, I want to go back to the topic I wrote on in my very first blog post back in 2009. In that post, I talked about why PowerShell (1.0) was something that I was interested enough in to start blogging.

Many of the points I mentioned there are still relevant, so I’ll repeat them now. Here are some of the things that made PowerShell awesome to me in 2009:

  • Ability to work with multiple technologies in a seamless fashion (.NET, WMI, AD, COM)
  • Dynamic code for quick scripting, strongly-typed code for production code (what Bruce Payette calls “type-promiscuous”)
  • High-level language constructs (functions, objects)
  • Consistent syntax
  • Interactive environment (REPL loop)
  • Discoverable properties/functions/etc.
  • Great variety of delivered cmdlets, even greater variety of community cmdlets and scripts
  • On a similar note, a fantastic community that shares results and research
  • Extensible type system
  • Everything is an object
  • Powerful (free) tools like PowerGUI, PSCX, PowerShell WMI Explorer, PowerTab, PrimalForms Community Edition, and many, many more. (ok…I don’t use any of these anymore)
  • Easy embedding in .NET apps including custom hosts.
  • The most stable, well-thought out version 1.0 product I’ve ever seen MicroSoft produce.
  • An extremely involved, encouraging community..

Of those things, the only ones that aren’t very relevant are the “free tools” (those tools aren’t relevant, but there are a lot of other new, free ones), and the 1.0 comment.

Since it’s been almost 11 years now, instead of talking about 1.0, let’s talk about now.

Microsoft, has placed PowerShell at the focus of its automation strategy. Instead of being an powerful tool which has a passionate community, it now is a central tool behind nearly everything that is managed on the Windows platform. And given the imminent release of PowerShell core, it will soon be (officially) available on OSX and Linux to provide some cross-platform functionality for those who want it. In 2009 you could leverage PowerShell to get more stuff done. Now, in 2017 you can’t get much done without touching PowerShell.

Finally, PowerShell is a part of so many solutions now, including most (all?) of the management UIs and APIs coming out of Microsoft in the last several years. Microsoft is relying on PowerShell to be a significant part of their products. Other companies are doing the same, delivering PowerShell modules along with their products. They do this because it is a proven system for powerful automation.

Why PowerShell? Because it’s awesome.

Why PowerShell? Because it’s everywhere.

Why PowerShell? Because it’s proven.

And my final point, which hasn’t changed since I talked about it in 2009 is that PowerShell is fun!

Are you looking to start your PowerShell learning journey? Maybe you have already started and are looking for pointers. Perhaps you’ve got quite a bit of experience and you just want to fill in some gaps.

Follow along with me and get-learning!

–Mike